by: Diego Montalvo
RootBSD VPS instances are installed with a current version of FreeBSD and with SSH access but nothing else. In this tutorial, you will learn how to update the ports tree and install PHP, Apache, and MySQL (FAMP Stack) on your VPS.
Logging in as root is disabled so you should login using the provided SSH user name and password provided by RootBSD. Once you have successfully logged into your VPS you may simply “su” to root.
Before we begin to install any ports, it is recommended that you update the ports tree so that any port you intend to build is the most current version.
Upgrading Ports Tree Using Portsnap
| # portsnap fetch update |
Installing Apache 2.2.x
First, we are going to install Apache HTTP Server.
| # cd /usr/ports/www/apache22 # make install clean |
| Choosing the default options will do just fine. Installation will take a few minutes.
|
| Figure 1. Apache Options Screen
|
| Wait for installation to complete. |
To run Apache web server from startup append the following to the “rc.conf” file.
| apache22_enable=”YES” |
Starting and Stopping Apache
| apachectl start |
| apachectl stop |
Once Apache has been successfully installed you can open your VPS address in a web browser and you should see the following text “It works!”
Potential Issues
You may run into some issues when starting Apache for the first time. Two of the most common are hostname and accf_http issues.
Hostname issues:
If you start Apache and the server throws back the following error:
httpd: apr_sockaddr_info_get() failed for XXXX
httpd: Could not reliably determine the server’s fully qualified domain name, using 127.0.0.1 for ServerName
You need to set your hostname. This can be done by editing /etc/rc.conf:
hostname=”x.x.xxx” < – Your server’s fully qualified domain name (FQDN).
accf_http
You may also get an error that looks like:
[warn] (2)No such file or directory: Failed to enable the ‘httpready’ Accept Filter
This is especially common on FreeBSD systems. To solve the problem follow these steps:
Type the following at the CLI:
# kldload accf_http # echo ‘accf_http_load=”YES”’ >> /boot/loader.conf
Restart Apache. (/usr/local/etc/rc.d/apache22 restart)
Installing PHP 5.3.x
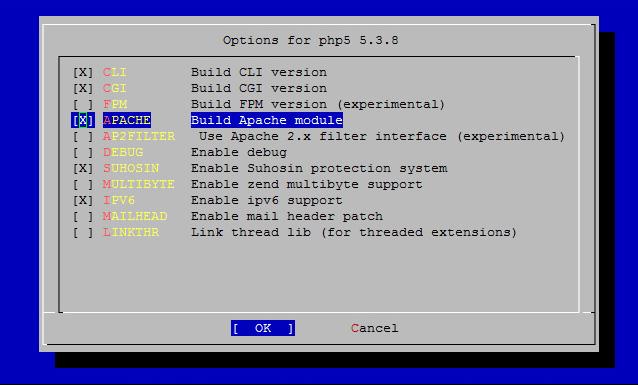
| # cd /usr/ports/lang/php5 # make install clean |
| Note: Select “Build Apache Module”
|
| Figure 1. PHP 5.3.x Options Screen
|
| Wait for installation to complete. |
| # php -v will output the version of PHP installed. |
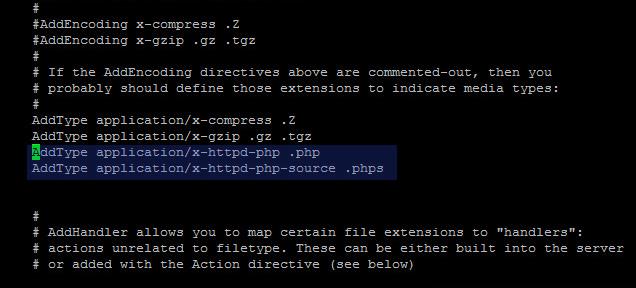
In order for PHP to parse correctly you must add a few lines to the Apache “httpd.conf” file.
Installing MySQL
| # cd /usr/ports/databases/mysql55-server
# make install clean |
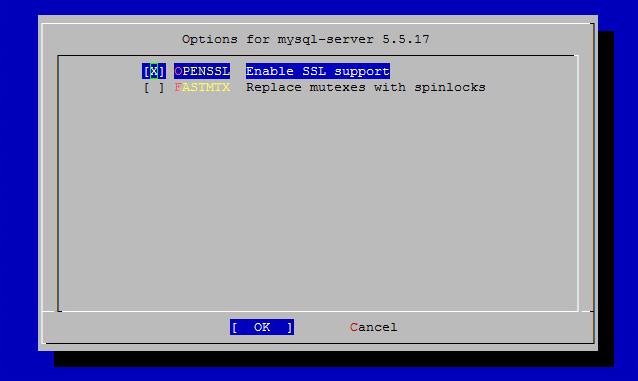
| Choosing the default options will do just fine. Installation will take a few minutes. |
| Figure 5. Installing MySQL With Default Options
|
| To run MySQL from startup append the following to the “rc.conf” file. |
| # mysql_enable = “YES”Once MySQL has been installed you can start it using either of the following commands:
# /usr/local/etc/rc.d/mysql-server start or # service mysql-server start |
It is strongly recommended to set a sysadmin (root) password for MySQL.
| # mysqladmin -u root password
New Password: <enter password> |
Additional Modules
Once you’ve installed the main components you may need to install some additional modules for everything to work well together. Three commonly used modules are:
/usr/ports/databases/php5-mysql
/usr/ports/www/php5-session
/usr/ports/graphics/php5-gd
For all of these just “cd” to the above directories and run (default options are fine):
# make install clean
Then restart Apache. (/usr/local/etc/rc.d/apache22 restart)
Finished
Once all three components are installed and configured you’re ready to start setting up a database driven site or application. To verify that everything is working correctly you can use a phpinfo test page.
Navigate to your web root (by default /usr/local/www/apache22/data), and enter the following:
# echo “<?php phpinfo(); ?>” > test.php
Now you should be able to open your VPS address in your browser and navigate to test.php (ex: 199.199.199.1/test.php). You should see a page showing your PHP version, as well as info on installed modules (including mysql).
| Resources | |
| FreeBSD | Http://www.freebsd.org/ |
| Apache Foundation | https://www.apache.org/ |
| MySQL | https://www.mysql.com |
| PHP Official Site | https://www.php.net/ |


